Documentation >
MAC-PAC Reference Library >
Financials >
General Ledger >
Key Concepts and Procedures >
Financial Statement Setup and Preparation
Financial Statement Setup and Preparation
To meet individual reporting needs, the General Ledger module allows users to define financial statement formats. Users specify the report headings, line descriptions, account classifications, and totals to appear on all financial statements. Column headings and data in the columns are fixed, but these can be changed through minor custom modifications.
The procedure for specifying financial statements is as follows:
1. Manually prepare report format. Prepare a handwritten or typed example of the headings, side captions, line descriptions, totals, and line spacing for the balance sheets and income statements to be prepared by the system.
2. Complete the Financial Statement. Ten report heading lines can be specified for each financial statement. The heading line is used to sequence and position headings on the report. If less than ten headings are entered, column and line descriptions are printed after the last heading. For example, if only three headings are defined, and the last heading line number is 03, column headings are printed on the fourth line of the report. Heading records for blank lines do not have to be entered. When a break in line numbers is detected, blank lines are printed to space the heading records. For example, if three heading records with line numbers of 01, 03, and 07 are entered, seven lines are printed as follows: the first heading, one blank line, the second heading, three blank lines, and the last heading.
Each report heading line has 132 or 198 available positions for report information. However, there are three lines where data that is left or right- justified is overlaid by system information. On line one, the first positions are reserved for the date and the last positions are reserved for the page number. On line two, the first positions are reserved for the time. On line three, the first positions are reserved for the report number.
3. Assign statement codes to reports. Assign a sequential, three position alphanumeric line reference (called a statement code) to each financial statement line. Statement codes must be assigned sequentially within each report type (balance sheet or income statement) for an entity. Because balance sheet and income statement heading and line descriptions are segregated by report type, statement codes from one report type can be duplicated in the other report type. Line descriptions are printed on each financial statement. (Statement codes are also assigned to the Account/Center Master File accounts that will be included in each financial statement line. See step 11.)
Assign a single statement code to each line description for a report. Statement code values can range from AAA to 999. Numeric and alphabetic characters can be combined in one statement code. Alphabetic characters are processed before numeric characters. For Example, ZZZ is processed before 2AA. Because of this, statement codes that begin with alphabetic characters should be assigned to line descriptions before statement codes that begin with numeric characters. This rule is also valid for the second and third characters of the statement code. An example is shown on the next page.
|
|
|
|
First Line Description Record
|
AKA
|
|
Last Line Description Record
|
RM1
|
|
|
|
|
First Line Description Record
|
AKA
|
|
Second Line Description Record
|
A9A
|
|
Last Line Description Record
|
ZA5
|
Leave several unassigned statement codes between each assigned code to accommodate future expansions or modifications. For example, use AAE, ABE, and ACE rather than AAA, AAB, and AAC.
Assign a new statement code to the first line description record for which an amount is printed on each Financial Statement. This practice allows detail account amounts (printed when the detail print is requested from the Financial Statement Request Screen) to be printed following the last previous side caption. Detail amounts are printed preceding the report line that contains a statement code equal to or following that of the detail account.
If both financial and statistical amounts will be printed on a report, two line descriptions must be entered, the first specifying that financial data will be printed, and the second specifying that statistical data will be printed. Both types of data cannot be printed on one report line.
4. Assign sequence numbers. If several report lines contain the same statement code, different sequence numbers must be assigned to each line. Sequence numbers identify the order in which each line within a single statement code will be printed. Sequence numbers are normally used to print blank lines and additional line descriptions. For example:
|
|
|
|
|
First Line Description Record
|
AKB
|
01
|
|
Second Line Description Record
|
AKB
|
02
|
|
Third Line Description Record
|
AKB
|
03
|
Sequence numbers are typically assigned to non-amount fields that will be printed consecutively. Sequence numbers are also assigned to a group of lines sharing one statement code. The amounts from each line are accumulated into a subtotal line which is indicated by a change in accumulator code. (See step 5.) If only one report line uses a statement code, the sequence number should be 01.
5. Assign accumulator codes. Assign a single-digit accumulator code to each financial statement line description record. The system provides six levels of accumulators to develop subtotals and totals for all columns of data on financial statements. Separate accumulators are maintained for financial and statistical amounts. The accumulator code controls printing and clearing of these accumulator levels. Typically, single line amounts are assigned low accumulator codes. Subtotal, total, and grand total lines are assigned higher codes. Valid codes and their functions are listed below:
0 — Prints line description only; does not print amounts.
1 — Prints level 1 accumulators and resets them to zero.
2 — Prints level 2 accumulators and resets levels 1 and 2 to zero.
3 — Prints level 3 accumulators and resets levels 1, 2, and 3 to zero.
4 — Prints level 4 accumulators and resets levels 1, 2, and 3 to zero.
5 — Prints level 5 accumulators and resets levels 1 through 4 to zero
6 — Prints level 6 accumulators and resets levels 1 through 5 to zero.
9 — Returns printing to the top of the next page before processing the next line description record.
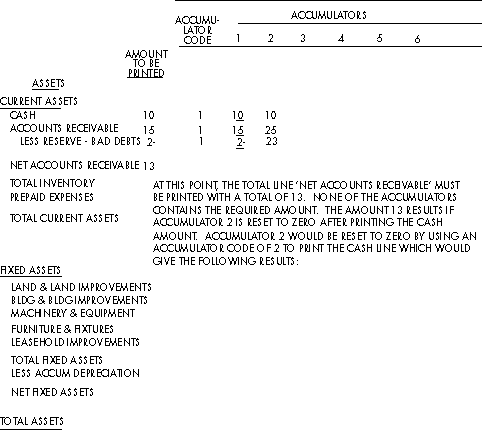
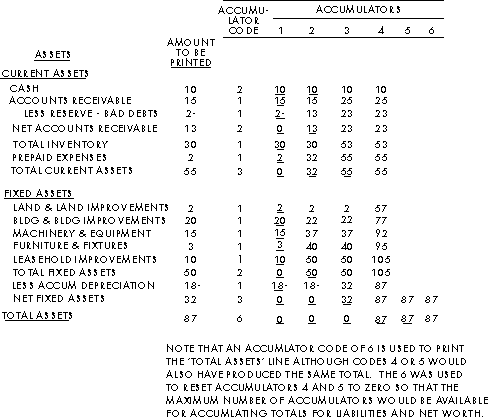
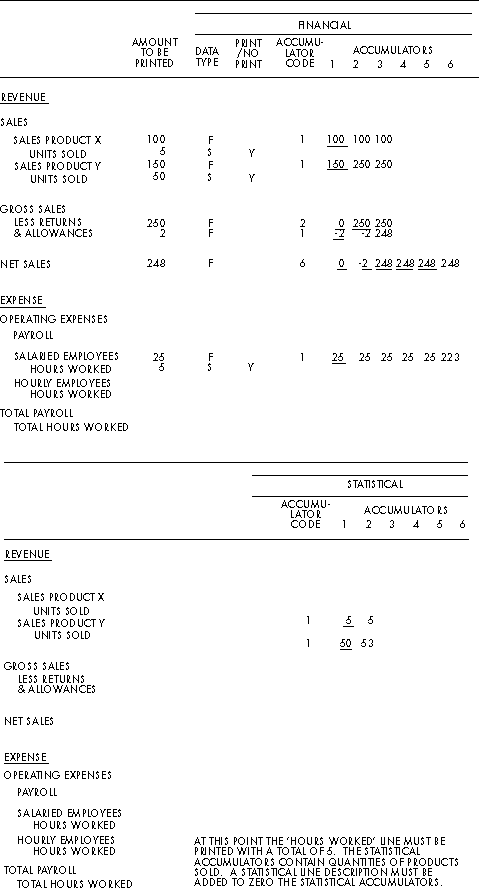
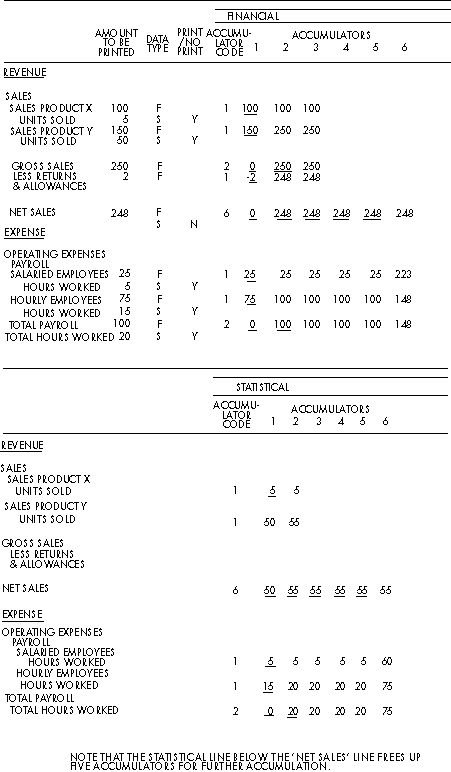
The following figures illustrate the assignment of accumulator codes necessary to develop various levels of totals on balance sheets and income statements. The contents of the accumulators before printing are shown on each line. The accumulators reset to zero after printing are identified by underscoring the amounts. Starting with the assignment of an accumulator code of I, the contents of the accumulators would be as follows:

Resetting Accumulator Code 2 for Net Accounts Receivable

Using Accumulator Code 6 (Total Assets) to Reset Codes 4 & 5

Statistical Accumulators

Adding Statistical Line Zeroes Statistical Accumulators
6. Assign percent denominator codes. The percent columns printed on income statements are calculated by dividing the current and year-to-date actual amounts by one of nine base denominator amounts. This facility allows the preparation of percentages based on financial amounts or statistical amounts. The percent denominator code assigned to a line description identifies the base denominator amount used to calculate the percent value for the line. (Percent denominator codes are also assigned to the Account/Center Master File accounts to be accumulated into each base denominator amount. See step 12.)
7. Assign data type code. Financial and statistical amounts can be printed on financial statements (see previous figures). The data type code is used to define which type of data to print on the specified line.
8. Define statistical amount printing. Statistical amounts may only appear on selected lines on a financial statement report, the statistical amount print code is used to identify when accumulated amounts are to be printed, and the line description associated with the statistical amounts. There may be cases where statistical amounts denominated in different units of measure, for example units produced and labor hours worked, may be printed on the same report as in the previous figure. To eliminate the possibility of accumulating incompatible units, a line description can be entered to clear the statistical accumulators prior to accumulating the new set of quantities. A line description with a statistical data type and a print statistic code of N accomplishes this task.
9. Assign edit codes. Account balances in the General Ledger module follow normal accounting conventions for debits and credits. Asset and expense accounts normally have debit balances, while liability, net worth, and income accounts normally have credit balances. Standard accounting procedures also dictate that debit and credit signs usually are not printed following account balances on financial statements unless the balance of an account is the opposite of its normal balance (for example, a credit balance in an asset account). The General Ledger module provides a one-digit character called an edit code that allows users to control the printing of debit and credit signs on financial statements. Through the assignment of edit codes, users can produce financial statements that conform to accounting standards and eliminate unnecessary or unwanted signs.
An edit code must be assigned to each financial statement line description record for which an amount is printed. The valid edit codes are:
Y - Print CR for credit amounts.
N - Print DR for debit amounts.
In general, lines containing asset and expense account amounts are assigned an edit code of Y. Therefore, a credit sign (CR) is printed only if the line amount contains a credit balance. Lines containing liability, net worth, and income account amounts are assigned an edit code of N. Therefore, a debit sign (DR) is printed only if the line amount contains a debit balance. However, if users want to see debit and credit signs printed for all (or selected) line amounts containing normal debit or credit balances, an edit code opposite the usual one for that line can be assigned. (For example, an edit code of N is assigned for lines containing asset account amounts.) When assigning edit codes for lines containing contra account amounts (such as allowance for bad debts), users must decide whether to print signs for these amounts and then assign the appropriate edit codes. For example, to print a CR sign for the line containing allowance for bad debts (an asset contra account), an edit code of Y is assigned. To print the amount without a sign, an edit code of N is assigned.
The figure below illustrates the relationship between edit code assignment and the printing of DR and CR signs on financial statements.
|
EDIT CODE
|
AMOUNT
|
|
Y
|
REVENUE
|
1,685,800
|
|
Y
|
LESS RETURNS AND ALLOWANCES
|
18,700
|
|
Y
|
NET REVENUE
|
1,667,100
|
|
N
|
REVENUE
|
1,685,800
|
|
Y
|
LESS RETURNS AND ALLOWANCES
|
18,700
|
|
N
|
NET REVENUE
|
1,667,100
|
|
Y
|
NET INCOME (DR - LOSS)
|
8,760
|
|
N
|
NET INCOME (DR - LOSS)
(IN BOTH CASES THERE WAS A LOSS)
|
8,760 DR
|
|
|
|
|
|
Edit Code Examples
10. Activate dollar sign print. To print dollar signs on amount lines, select a print dollar sign code of Y.
11. Activate underscore. To print underscores beneath the amounts on a given report line, select an underscore line of Y.
12. Assign statement codes to all Account/Center Master File accounts. The statement code assigned to each master file record corresponds to the statement code on the financial statement line in which the account will be included. Thus, one or more accounts can be grouped into a single financial statement line.
When assigning statement codes, users may elect to create more classifications of accounts in the Account/Center Master File than in the financial statement line descriptions. This technique allows future expansion of account classifications on the financial statements without the need to reassign statement codes in the Account/Center Master File. It also allows the user to produce multiple sets of financial statements at different levels of detail by having multiple heading and line description files. This technique is illustrated in the next figure.
Account/Center Master File
|
Fin. Stmt.
Line Description
|
|
|
Financial Statement Total
|
Detail Presentation:
|
ABA
|
|
cash -- First National
|
5,000
|
|
|
|
ABC
|
CASH -- FIRST NATIONAL
|
|
5,000
|
|
ABF
|
|
cash -- Harris Trust
|
6,000
|
|
|
|
ABH
|
CASH -- HARRIS TRUST
|
|
6,000
|
|
ABK
|
|
cash -- payroll
|
4,000
|
|
|
|
ABM
|
CASH -- PAYROLL
|
|
4,000
|
|
ABO
|
|
cash -- cash drawer
|
1,000
|
|
|
|
ABQ
|
CASH -- CASH DRAWER
|
|
1,000
|
|
ABT
|
|
savings account No. 1
|
2,000
|
|
|
|
ABW
|
SAVINGS ACCOUNT NO. 1
|
|
2,000
|
|
ABY
|
|
savings account No. 2
|
3,000
|
|
|
|
ABZ
|
SAVINGS ACCOUNT NO. 2
|
|
3,000
|
Immediate Presentation:
|
ABA
|
|
cash -- First National
|
5,000
|
|
|
ABF
|
|
cash -- Harris Trust
|
6,000
|
|
|
|
ABH
|
CASH IN BANKS
|
|
11,000
|
|
ABK
|
|
cash -- payroll
|
4,000
|
|
|
ABO
|
|
cash -- cash drawer
|
1,000
|
|
|
|
ABQ
|
CASH IN IMPREST ACCCTS
|
|
5,000
|
|
ABT
|
|
savings account No. 12,000
|
|
|
|
ABY
|
|
savings account No. 23,000
|
|
|
|
|
ABZ
|
CASH IN SAVINGS ACCTS
|
|
5,000
|
Account/Center Master File
|
Fin. Stmt.
Line Description
|
|
|
Financial Statement Total
|
Summary Presentation:
|
ABA
|
|
cash -- First National
|
5,000
|
|
|
ABF
|
|
cash -- Harris Trust
|
6,000
|
|
|
ABK
|
|
cash -- payroll
|
4,000
|
|
|
ABO
|
|
cash -- cash drawer
|
1,000
|
|
|
ABT
|
|
savings account No. 1
|
2,000
|
|
|
ABY
|
|
savings account No. 2
|
3,000
|
|
|
|
ABZ
|
CASH
|
|
21,000
|
*Note: Lower case indicates account description. Upper case indicates Financial Statement description.
Statement Code Assignment
13. Assign percent denominator codes. Assign a percent denominator code of 1 to 9 on each Account/Center Master File income and expense account that should be accumulated into a base percent denominator amount. This amount is used to calculate each line amount on the income statement as a percentage of the base amount. The value (financial or statistical) of each denominator is defined by the user. For example, consider the figure below.
Account/Center
Master File
|
|
|
% Denominator on Account Master
|
|
Domestic Sales
|
5,000
|
KKK
|
1
|
|
Intercompany Sales
|
1,500
|
KLK
|
1
|
|
International Sales
|
2,200
|
KMK
|
1
|
Determinator Code Assignment
If a percent denominator of 1 is specified on the financial statement lines, and each of the sales accounts are separate financial statement lines, the following percentages will be printed on the income statement:
|
Domestic Sales
|
57.5%
|
= 5,000/(5,000 + 1,500 + 2,200)
|
|
Intercompany Sales
|
17.2%
|
= 1,500/(5,000 + 1,500 + 2,200)
|
|
International Sales
|
25.3%
|
= 2,200/(5,000 + 1,500 + 2,200)
|
14. Determine default rounding factor. Update the Reference File processing options (category P01) record for each entity to specify whether to round financial statement amounts to dollars or thousands of dollars. Rounding is selected independently for each entity's financial statements. This default value can be overridden when financial statements are selected for printing.
15. Determine financial statement codes for rounding and translation. Update Reference File category P02 to indicate which statement codes should be used to report any balance sheet rounding differences, income statement rounding differences, and translation adjustment.
16. Enter the heading and line description data online using the Financial Statement Title File Maintenance Conversation. This conversation supports both single record entry and mass maintenance functions. After the heading and line description records for one report have been entered, mass creation processing can be used to duplicate records of the original report for another report. Minor differences between the original and the created heading and line description records can be changed individually or by using the mass change facility.
17. Ensure report accuracy. Print balance sheets and income statements using the detail print option to ensure that headings and line descriptions are correct and that all amounts are printed on the proper report lines. The detail print option is set by updating the Reference File processing options records for all entities, and can be updated on the Financial Statement Request Selection Screen when Financial Statements are selected for printing.
18. The Financial Statement Request Selection Screen is used to identify which reports to select for printing. The report date to be printed on each report must be specified. Financial statements, forecast reports, or both types of reports can be selected for printing. To print financial statements for all entities, enter a value in the number of copies field on the top portion of the screen. Individual financial statements can be printed by specifying a number of copies value for each report to be printed. Default rounding and detail print options can be changed when reports are selected for printing. The changed values for these options will be in effect only for the specified print request. To change the default rounding and detail options for a report, permanently update the processing options record on the Reference File for the entity.
If you are using the management reporting option (Management Account Reporting flag on Reference File category 133 set to Y), a reporting class must be specified for each financial statement title line. A statement title with a fiscal reporting (F) class will only be printed on a fiscal balance sheet. A statement title with a management (M) reporting class will only be printed on a managerial balance sheet. Statement titles with a common (C) reporting class are printed on both fiscal and managerial balance sheets.
Related